At last, finals and the fall semester are both finally over. It's been a while since my last blog post and a lot has happened since then. To start off I was finally able to attend my first Autodesk University event after being denied attendance last year, since I did not meet the age requirement. One of the many things I love in life is knowledge and oh man their was a ton of it at Autodesk University 2012. From starting your own user group to best practices for coordinating multiple disciplines on a Revit project. While at AU, I was also able to become certified in both AutoCAD 2013 and Revit Architecture 2013. Although, it would be rather great if a Revit MEP certification was also available, hence that's where my current focus is. Overall, the entire event went better than expected. With having said that I would like to welcome the new year!
With every new year comes new objectives that one decides to accomplish for that year. I, myself have quite an extensive list of what I plan to accomplish this year already in the works of being completed. One of my top priority objectives is getting my LEED Green Associate certification. Let us welcome this new year in which we hope all your new year's resolutions become true.
Saturday, January 26, 2013
Thursday, November 8, 2012
Electrical and Telecom Duct Banks
I would have imagined by now that Autodesk would have added a tool for creating underground duct banks, of course assuming that all that needed to be done would be a system family similar to the duct system family. I've just started getting into the Revit API, otherwise I would figure out a solution myself. Until then, here is a workaround that I have been using for quite some time...enjoy.
We first begin by simply creating a new duct type called "Duct Bank" and then adjusting the fitting settings as shown in the image below.


We first begin by simply creating a new duct type called "Duct Bank" and then adjusting the fitting settings as shown in the image below.

Next, create a new duct system called "Duct Bank."
Adjust the Duct Bank duct system settings as shown below.

Then draw a simple duct layout on a floor plan view using the newly created duct type called "Duct Bank."

Create a filter called "Duct Bank."

Adjust the Duct Bank filter settings as shown below.

Next, navigate to the View tab > Visibility Graphics.

Ensure that the categories highlighted below have a check. 
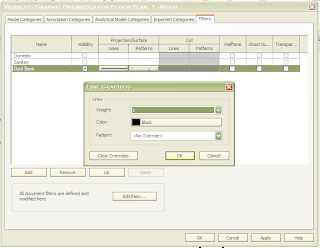
With the Visibility/Graphic Overrides dialog still open, navigate to the Filters tab. Add the filter "Duct Bank" that was previously created.

Adjust the line graphics as shown below.
Next, adjust the fill patterns graphics as shown below.

Here's the final result.

Please feel free to share any ideas that may help improve this method of creating duct banks.
Thursday, October 18, 2012
Maintaining a Healthy and Speedy Revit Model
In an effort to help the BIM community with using efficient Revit models here are some tips that I've picked up along the way for maintaining a healthy and speedy Revit workshared model. Please make sure that these tasks are performed by an experienced Revit user.
- Re-Create the Central File
- Re-creating the central file on a weekly basis will help avoid a model's database from getting corrupted.
- Audit/Compact/Purge
- Auditing, compacting, and purging at least once a week are essential to keeping the model file size relatively small.
- Warnings
- Review and fix warnings as soon as they appear. Ignoring them will just pile up to hundreds and maybe thousands of warnings that will eventually have to be resolved.
- In-Place Families
- Although in-place families may be a quick way for creating custom families on the go, be prepared of the toll it will take on the model's performance especially if placing multiple instances of the same in-place family.
- Content Detail
- Often times, Revit users tend to get carried away as to what needs to get modeled. The best method on avoiding this would be to decide on the LOD for the model and having only one user in charge of content development.
- Unused Views
- Creating views in Revit can be tempting due to the ease of creating them, but can also add to the model file size if they are not managed properly. Reusing views, like sections, is one of the best ways to help minimize the amount of views that need to be created. Creating a view list schedule is another great way to easily manage and expedite the process of removing any unnecessary views.
- Embedded CAD and Image files
- Check for and remove any unused image files that have been inserted and forgotten. Also, make sure that CAD files are LINKED and not IMPORTED. I can't think of a good reason why you would want to import CAD files into a Revit project. Details come to mind, but then again shouldn't these have been converted into Revit details to begin with?
- Imported Linestyles
- Imported linestyles can appear as a result when importing CAD files into a Revit model. Getting rid of theses linestyles can be a daunting task since they can't be purged out of a model and can cause havoc if any of the imported linestyles are still in use when deleted.
- Constraints
- Minimize the amount of constraints that reside in a Revit model. Trying to pin down all equipment in a project can be understandable but can also seriously hurt a model file's performance.
- Groups
- Be careful to only add non-hosted elements to groups. Adding elements like windows, which are wall hosted, will result in either warnings or errors when trying to place the group in areas where no walls exist.
- Design Options
- Limit the amount of design options within a Revit model and make sure to remove the remaining design options once one is agreed upon.
- Linked Models
- Place linked Revit models under their own workset.
Monday, October 8, 2012
BIM Project Execution Plans...a failure?
BIM Project Execution Plans have been in the AEC industry for quite some time now but still seem to not be reaching their fullest potential. They're being filled out in the early stages of projects, as they should, but after are stored into a shelf somewhere in the office never to be seen again. Wasn't the whole purpose of these documents to be used on projects to maintain the constant flow of collaboration? I guess not. It may just be that not all team members on the project aren't on the same page in regards to the whole purpose of BIM. It wouldn't be of any surprise that BIM projects today still have some team members that don't have any idea of what BIM is. There's nothing wrong with that, I don't blame them necessarily. But who's to blame? The project manager for not having the project team prepared as to what they were getting into and what was actually being asked of them as a final deliverable? Or the owner for not choosing the right team?
Setting aside who may be at fault here, the situation still stands as to why BIM Project Execution Plans (PxPs) seem to keep failing. The lack of enforcement of these documents being another reason, encourages team members to head in their own direction causing problems later on in a project. At first it may not seem like a big deal but as the project nears completion small documentation tasks that would take a couple of hours to complete are now taking twice as long due to the lack of coordination at the beginning of the project.
If you plan on implementing BIM or BIM PxPs make sure the entire project team receives the proper training and by this I do not mean just learning the definition of BIM and some of the fancy acronyms that are out there, but to study how the process is meant to be used. Read through some of the case studies that are available on the web to get a better grasp of what will be accomplished by using BIM. After all isn't this what we all want? for everyone to get along in a project and not end up filing law suits to one another?
Tuesday, October 2, 2012
Where's my keynote tag?
Time and time again keynote tags tend to disappear on their own without any notice causing frustrations within the project team. Say goodbye to your frustrations for I have come up with a workaround which to this day has been successful in my office. Before I begin keep in mind that tags need to be associated to an element called the "host" for you non Revit users. Also keep in mind that tags tend to follow some of the behavior of the element that they are hosted to. For example, if a duct is moved 5" to the right, the tag for that duct will move along with it. The same applies when hiding elements within a view in Revit, the tag will simply turn off if the element that it is hosted to is turned off. Simple right? So here's the scenario, you're half way through a project and you notice that your keynote tags for a piece of duct start disappearing for an unknown reason. You begin the standard protocol for searching for hidden elements, but you have no luck. You end up finding out that the host of the keynote tags were being deleted as you modified segments of the duct to allow for new duct work, hence deleting the keynote tags. I come across this problem all the time and came up with a simple solution which has saved me and the project team a lot of headaches and most importantly budget. Here's my solution. I simply created a detail item family with detail lines under a new subcategory called "Hide - Only for Reference."
 This gives you the flexibility of turning off the line work once the family is inserted into a project without having to turn of the detail items category hence affecting the presentation of your drawings. This family basically serves as a dummy host for associating keynote tags without having to deal with missing keynote tags and information within your keynote legends. I usually place this family at the intersection of two grid lines or somewhere that it will be easily seen by project team members for keynote referencing. Just remember to make minor adjustments to your sheet view templates and you're good to go!

Saturday, September 29, 2012
Welcome!
Hello and welcome to Revit Madness! My name is Jonathan and I will be the main blogger for now. I am currently a CAD Designer at P2S Engineering, Inc. and a part time college student. I began using Revit Architecture 2010 in the year 2009 and haven't stopped since. A year later I decided to change my major from Architecture to Mechanical Engineering. I'd have to say that the transition from using Revit Architecture to Revit MEP was quite challenging. Although I'm glad I didn't have to deal with using the '09 release of Revit MEP, since from what I've heard was an unpleasant release.
In this blog I plan to go over some of the obstacles encountered in the AEC industry through the usage of Revit, IPD, and BIM. I also plan on discussing the best practices in using and implementing Revit and BIM into projects. Finally, I hope to encourage readers that BIM can be a good thing if implemented correctly. The benefits of BIM are almost limitless, but only if you choose to use it to its fullest extent.
Please feel free to contact me with any questions or ideas for future blog posts.
Thanks for reading and enjoy!
Subscribe to:
Posts (Atom)